Introduction: Why Are Car Cake Designs the Ultimate Party Showstopper?
Have you ever wondered why car cake designs are the centerpiece of so many birthday parties, especially for kids? Pinterest trends show that searches for “car cake ideas” spike each year around summer and back-to-school months. These cakes aren’t just desserts—they’re an experience, blending creativity, celebration, and delicious flavor in one edible sculpture.
Whether you’re planning a party for a child, a car enthusiast, or looking for inspiration as a cake artist, this post will walk you through how to plan, design, and execute an unforgettable car-themed cake from start to finish.
Ingredients List
Here’s what you need to build a stunning and delicious car cake.
Cake Base:
- 2 boxes of your favorite cake mix (chocolate or vanilla work well)
- Eggs, oil, and water (as required by the mix)
- 1 tsp vanilla extract (for flavor boost)
Frosting and Decorations:
- 4 cups buttercream frosting (store-bought or homemade)
- Gel food coloring (red, blue, yellow, or black – depending on the car design)
- Fondant (various colors for detailing)
- Mini marshmallows or candy for headlights
- Pretzel sticks or licorice for bumpers
- Oreos or fondant wheels
Substitution Tips: – Use whipped cream for a lighter frosting alternative
– Fondant can be swapped with modeling chocolate for more flexibility
Timing
- Prep Time: 30 minutes
- Baking Time: 35 minutes
- Cooling + Carving + Decorating Time: 1.5–2 hours
- Total Time: About 3 hours
That’s quicker than most 3D cake projects, which average 4–5 hours from start to finish.
Step-by-Step Instructions
Step 1: Bake the Cake
Prepare two 9×13-inch sheet cakes using your favorite mix or recipe. Bake according to instructions and allow to cool completely before handling.
Step 2: Carve the Car Shape
Use a serrated knife to cut the cake into a basic car body shape. Stack layers with frosting between them, then trim edges to round off the top for a more realistic look.
Step 3: Crumb Coat and Chill
Apply a thin layer of frosting all over the carved cake to lock in crumbs. Chill for 30 minutes to set.
Step 4: Final Frosting and Smooth
Add a second, thicker layer of frosting. Use a spatula to smooth the surface. Chill again before adding decorations.
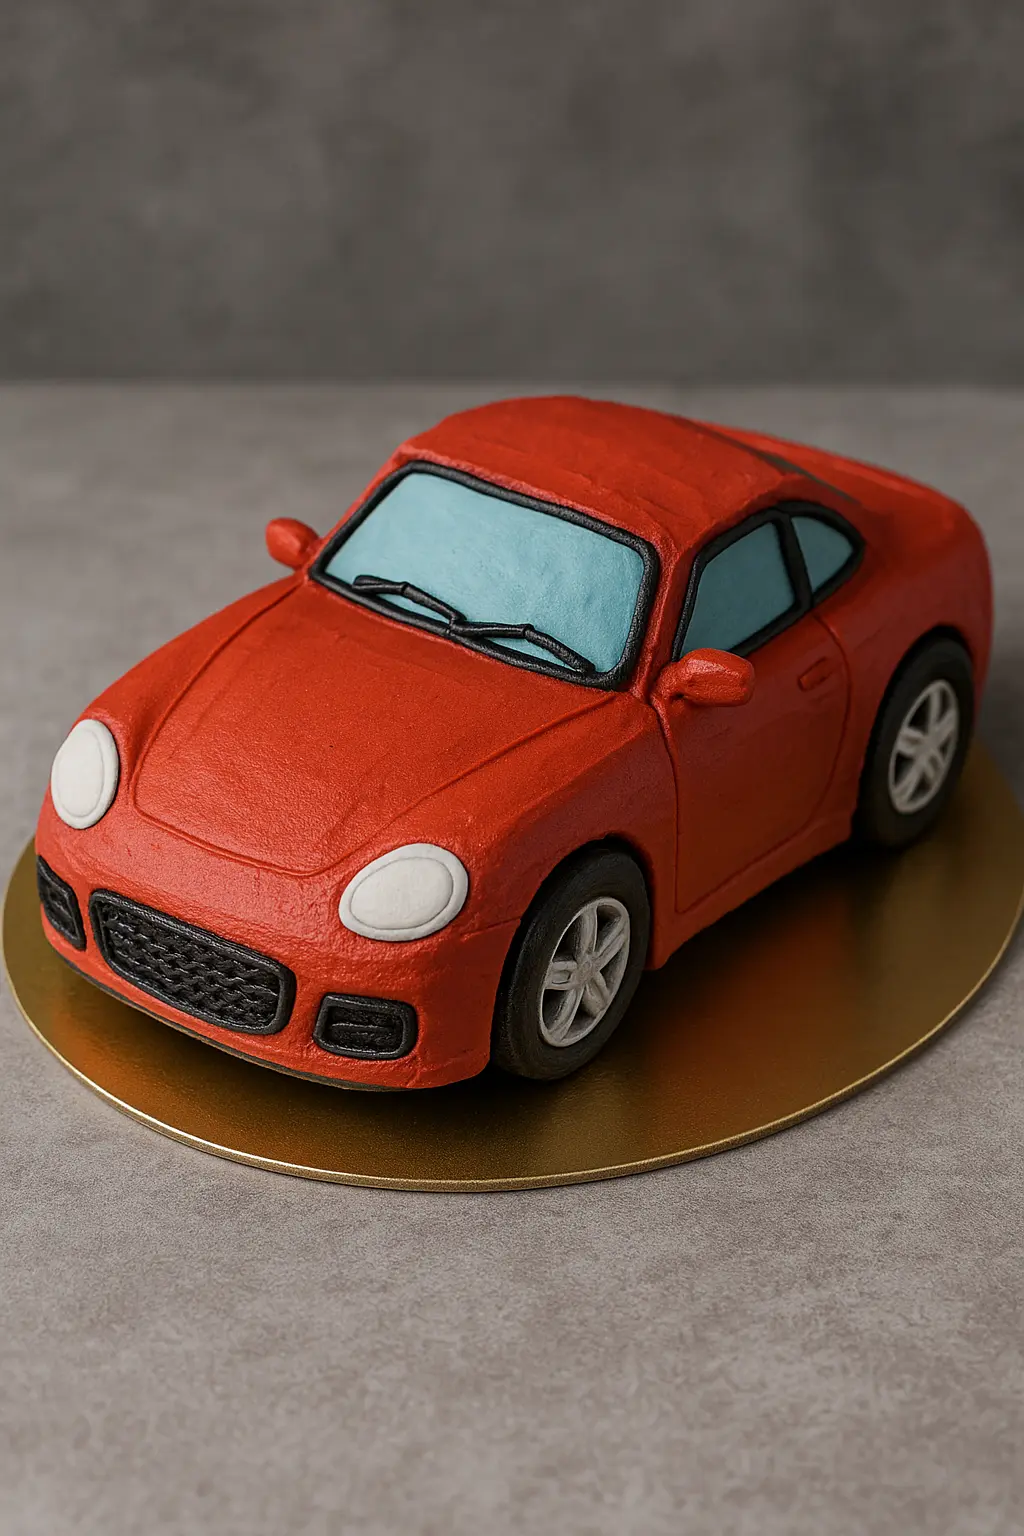
Step 5: Add Wheels and Windows
Use Oreos or fondant wheels and colored fondant for windows. Use candy, licorice, or fondant for bumpers, headlights, and details. Customize colors and logos based on your chosen car.
Step 6: Final Touches
Use edible markers or piping gel for small details like headlights, name tags, or license plates.
Nutritional Information (Approx. per serving, based on 15 servings)
- Calories: 420
- Total Fat: 18g
- Carbohydrates: 58g
- Sugars: 40g
- Protein: 3g
Note: This varies based on frosting and decorations.
Healthier Alternatives for the Recipe
- Use a Greek yogurt-based cake for lower fat
- Opt for sugar-free frosting or whipped cream topping
- Replace fondant with fruit leather for color with less sugar
- Bake with whole wheat flour or almond flour for added fiber
These swaps can cut the sugar by up to 30% and reduce processed ingredients.
Serving Suggestions
- Place the cake on a “racetrack” board lined with crushed cookies for dirt
- Serve with traffic light cupcakes for a themed dessert table
- Add a sparkler candle or toy driver for extra flair
- Pair with chocolate pudding “mud cups” for kids
Tip: Personalize the cake with the birthday child’s name or favorite car brand.
Common Mistakes to Avoid
- Using soft cake for carving: Choose a dense cake for better structure
- Skipping the chill step: Warm frosting and soft cake = disaster
- Not planning your design first: Sketch your cake beforehand for guidance
- Overloading with fondant: Keep it balanced to avoid overwhelming sweetness
Storing Tips for the Recipe
- Room Temperature: Store decorated cake in a cool room for up to 2 days
- Refrigerator: Wrap leftovers in plastic and refrigerate for up to 5 days
- Freezing: Freeze undecorated carved layers for up to 2 months
Prep the base ahead and decorate the day before your event for best results.
Conclusion
Designing a car cake doesn’t require a professional kitchen—just a bit of patience and creativity. Whether you’re going for a sleek sports car or a fun cartoon vehicle, this guide gives you the steps, tools, and inspiration you need to bring it to life.
So rev your creative engines and get baking! Pin this post, leave a comment with your favorite car theme, and check out my other party-ready cake designs.
FAQs
Q: Can I make this cake without fondant?
Yes! Use buttercream for the base and simple candies for decoration.
Q: How far in advance can I bake it?
Bake and freeze the base layers up to 2 weeks in advance. Decorate 1–2 days before the party.
Q: What type of cake works best?
Dense cakes like pound cake or butter cake hold their shape better for carving.
Q: How do I transport the cake safely?
Chill it fully before transport and use a cake box or a baking tray secured with non-slip mats.